Wednesday, May 18, 2011

4th of July Fans

4th of July Paper Fans


I wanted to share this cute instruction how-to that I saw on MarthaStewart. It's an easy way to take an ordinary store bought fan and make it custom and much more chic!


Step 1
To make a pendant smaller, trim the closed fan diagonally, near its unstapled end. (For the smallest pendants, you may want to remove some tissue layers so the fan will open fully.)


Step 2
If adding a medallion, snip the closed fan along 1 edge of cardboard, cutting off 1 staple; this will create a flat center.


(go to Martha Stewart

to get the free printable centers for the fans)


Step 3
Set your printer's margins to zero (or as narrow as possible). Print medallions onto heavyweight paper. If using 8 1/2-by-11-inch paper, choose small medallion clip art; large medallion will work on 11-by-17-inch paper. Cut out each medallion with scallop scissors: Start by aligning scissor edge with cutting guide, and follow trajectory.


Step 4 If you cut off a staple to make a flat center, pinch together the loose tissue at center, and secure with a dollop of hot glue; then attach medallion to center using hot glue. Hang pendant with monofilament.

Saturday, May 14, 2011

Wizard of Oz Invitations


As you know I shared that this past week most of my time was spent creating invitations for a client throwing her daughter a Wizard of Oz party for her 2nd birthday. Below are a few photos of part (yes, only part of the whole invitation) of what is going to be used for the invitations. I created glittered red slippers with a blue gingham insert and then rolled the invitation and tied it with a bow. She then is going to put theses slippers in a yellow box with hay. I created a cute matching tag for the top of the box that will then be tied with a yellow bow. These are then going to be hand delivered. If you want to make these yourself I am attaching a link below for you to find a template. I do want to warn as I always try to do...I would not suggest these for a large party. I only say that because I made 60 of these and they took at least 30-40 minutes each, probably more if you count touch ups etc. Also, I used glitter paper and a gingham insert so I had over $2.50 in paper per shoe. One tip: It has faster to glue the blue gingham and red glitter paper together and then cut the shoe out. On the link it gives you two seperate templates, one for the shoe and one for the insert but trust me on this just glue the paper together and then cut the shoe out.


Posted by PicasaTemplate for these shoes can be found at Skip to My Lou

Friday, May 13, 2011

4th of July Party Table

Hey everyone! I wanted to share a few things that I have been working on lately. I had a huge order of invitations from a client that were so time consuming but I think they turned out cute. I will share those with you tomorrow. Also, I am in the beginning stages of my 4th of July line that I offer in my Etsy store and I've posted a few pre-view pictures. I've got some fun upcoming parties and ideas to blog about and I'm looking forward to seeing what you think!


Posted by Picasa

Wednesday, May 11, 2011

Camping Party Shirts

I forgot to share the shirts I had made for my sons camping party. I made the whole family (and yes I even made my husband) wear them!:) They said "Camp Counselor" and then on the tent had my sons name. It maybe took me 20 minutes to design online but was a fun detail the day of the party.


Thursday, May 5, 2011

Queen for a Day Cupcakes

With Mother's Day right around the corner I wanted to share these fun cupcakes I founf On Family Fun.


This Mother's Day give the moms in your life the royal treatment by serving up these tiny sweets.

Ingredients
Pink-frosted mini cupcakes
Mini yellow Laffy Taffy bars
Water
White frosting
Sparkling sugar
Sugar pearls
Red decorator gel
X
Instructions
To make the crown, place a wrapped mini yellow Laffy Taffy in a cup of warm water for 2 to 3 minutes to soften it. Unwrap it, then flatten it with a rolling pin until it's 1-1/4 by 3-3/4 inches. Use a knife to straighten the strip's edges.

With the tip of a teaspoon, cut five arches along one edge, as shown. Join the ends to form a crown and seal the seam with a few drops of water. Let it sit for about 10 minutes to harden slightly.

Dip the bottom of the crown into white frosting, then into sparkling sugar, and press it into place on a pink-frosted mini cupcake. Apply a small dab of white frosting with a toothpick to each crown point, then press on a sugar pearl. Add red decorator gel jewels around the middle of the crown for a final flourish.

Sunday, May 1, 2011

Campout Party Pt 2

Pt. 2 of the Camping Party


I had several games planned for the party. We created a scavenger hunt with items like snakes, birds nest ( that I made), bugs, spiders, etc....all things boys love! We hid them all over the yard and then gave each child a list and a burlap bag to "hunt" with.


A few pics of the kids searching for the items on the list.


We also broke into three groups and did activities like sack races, a money dig in sand and fishing. We attached washers to plastic fish and put a magnet on the end of the fishing line and the kids had to catch one of each color fish before they got their prize.


Before the kids went home they got to take their camp bag and fill it with goodies.


I had bug nets and bug suckers, water guns, bug activity books, bug catchers and viewers, bubble guns and balls.

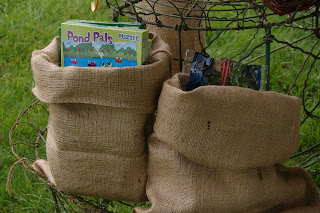
I also had bug and frog puzzles, legos, and water bottles. I used old ammunition boxes, baskets, and rolled burlap bags to hold the goodies.


I used this twig bag to hold more of the take home favors.


Here was the invitation I used. A tent to set the theme!


Posted by Picasa